Abita+ GH
Abita+ GH is a generative apartment planner for grasshopper. It automatically creates solutions from investor’s briefs
Historical background
The first version of Abita+ dates back to 2001. Concepts are, in the computer world as in other domains, concepts that are discovered and forgotten, then rediscovered in the belief that they are innovative or original. At the dawn of the 20th century, to explore architectural solutions, there were three ways. The first was to mimic analogical tools and methods. This is the virtual drawing board such as AutoCad for example. The intellectual process is the same as for hand drawing, it is only the ease of corrections, re- editing and duplication that make it a very productive tool. The second path, less known and somewhat forgotten, is that of declarative modeling. In this method, the idea is to start with the expected result and work backwards through the inductive chain. For example, I declare that in the morning I want to have sunshine in my room and automatically a set of solutions in a set of constraints will indicate how this is possible. The main issue with this method at the time was the semantic aspect. It was difficult to choose descriptors, to have the right vocabulary, to solve what the human brain is capable of doing so well, to discriminate, sort, and prioritize information so that nuance is not complexity.
For example, if I say I want a big living room, will my mental image be similar to my neighbor’s or not? The concept of semantic descriptors leading to graphical solutions has recently resurfaced with extraordinary force after a long silence. By the time we write these lines, the power of these tools will have surpassed our wildest dreams. The third category in which we present what we present in this article is that of generative tools (sometimes called genetic). Many solutions are proposed quickly, whereas the human brain would take time to elaborate on just one. The decision is then made in the optimization of solutions through successive refinement until the most satisfactory solution is found. Contrary to some quick assumptions or comments, it is not a matter of finding the optimal solution, which would see all cursors pushed to their maximum, but of responding to a balance of options that prioritizes certain parameters over others.
Abita+ version 1
Abita +’s first version was created between 2000 and 2001. The concept was submitted to a national innovation competition, which we won, and which provided us with a substantial financial budget to develop the application. The principle is as follows: we take a promoter’s investment brief and propose a large number of feasibility that correspond to his brief. See also http://www.keris-studio.fr/blog/?p=12016
The input data are as follows
- – Percentage of each type of housing: 1 room, 2, 3, 4 to 5.
- – Surface for each type of housing: between 30 and 15m² for one room
- – And finally value for each type of housing.
This is summarized as follows
| Type | Value | Surface Mini | Surface Max | Quantity Min | Quantity Max |
| T1 (one room) | 70 | 30 | 45 | 0 | 100 |
| T2 | 80 | 45 | 60 | 0 | 100 |
| T3 | 100 | 60 | 65 | 0 | 100 |
| T4 | 50 | 75 | 85 | 0 | 100 |
| T5 | 40 | 85 | 100 | 0 | 100 |
It means that we need more T3 than T2 and T5 will be the most difficult apartments to sell because of it’s size.
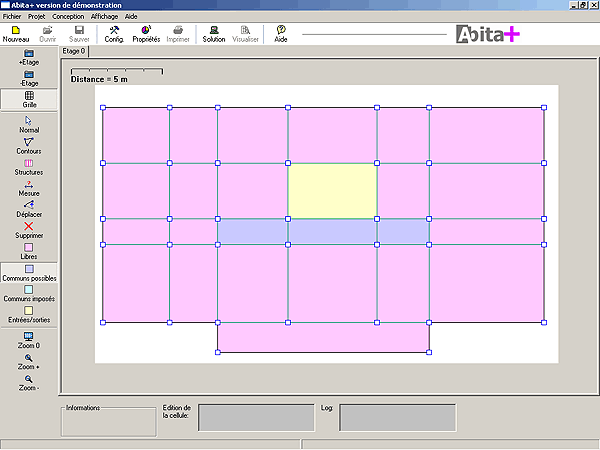
Then the idea is to sketch a very basic contour with the structural layout in order to have a very basic shape to start with.
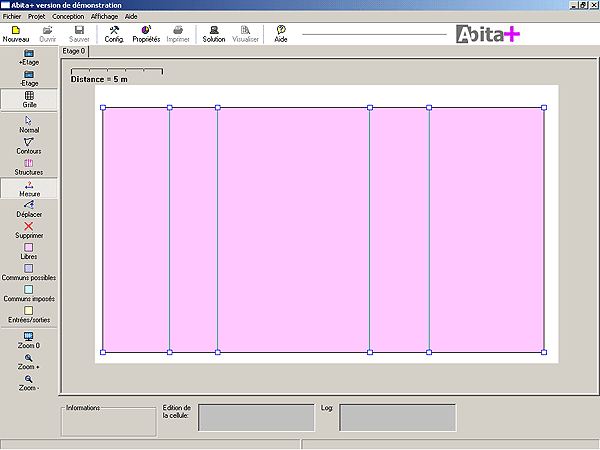
It is then possible to enhance the drawing by adding more cells or by sculpting the contour. To help the process, we try as much as possible to follow a structural pattern. For instance in France, a concrete structure will have a distance of a beam every 6.4 which matches with an underground carpark.
The cells codification will follow this logic:
| By default a cell is free, i.e. it will be as- signed to the surface of an apartment. | |
| The possible common areas are cells that can either be assigned to circulation or to an apartment. | |
| The imposed common areas are necessarily circulation areas. | |
| The entrances/exits correspond to the entrance and exit areas. |
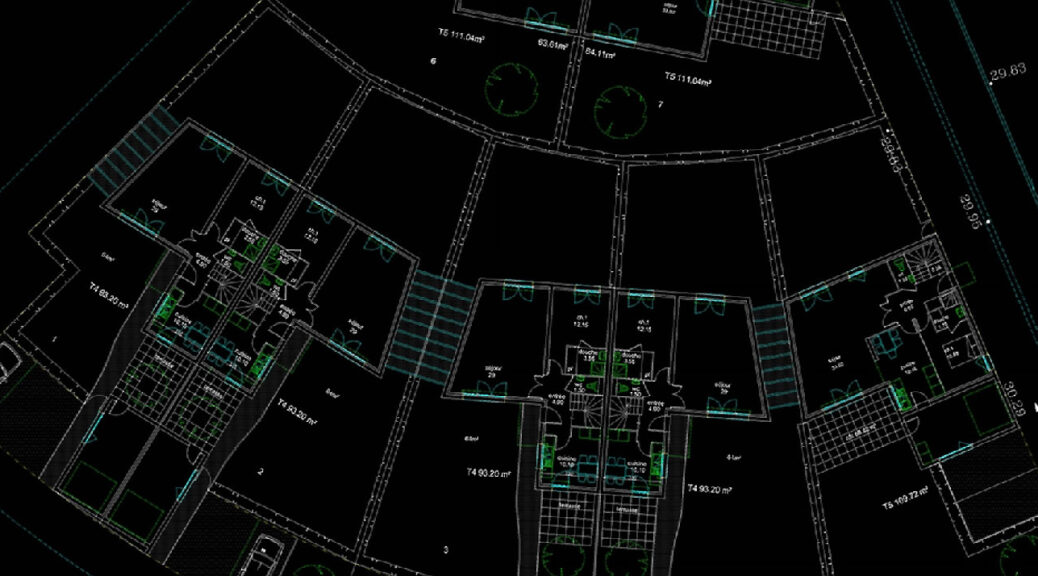
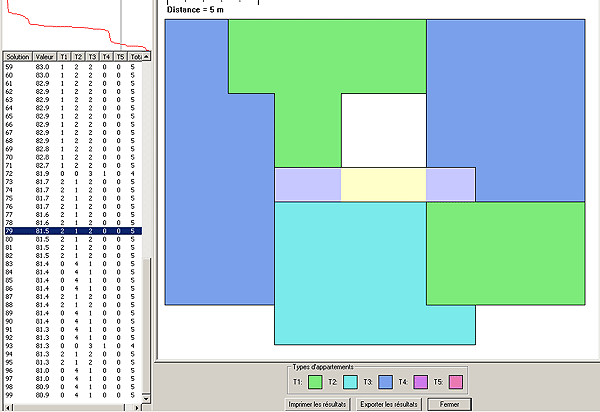
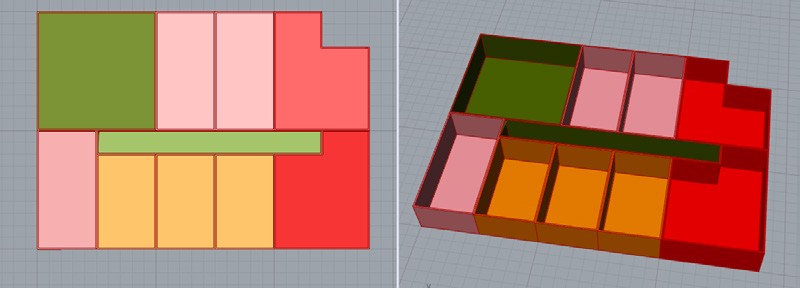
We can see on the following image, one solution out of a hundred with 2 one room apartment, one with two rooms, and 2 with three rooms. As it is ranked in the 79th position with a score of 81,5 %, it means this reseult is average, but still could be chosen for several other reasons.
The application allows a maximum of 100 floors but will not follow a logic optimization of HVAC/ATU. Services like garages for bikes, technical rooms are also not being taken into consideration but could be coded as common areas for example.
A drop of theory
The functions provided by the application will take the form of “functional blocks” for Grasshopper, with the following characteristics, modelled on the first Abita+ project
- – “solver” block: allows to solve the feasibility problem.
- – input: shapes, layouts and coordinates of the surfaces in which to work, with their type (free cell, possible commons, imposed commons, entrances/exits) as well as the processing parameters (the possible types of housing, with for each their value, minimum and maximum surface, and minimum and maximum quantity). It should also be possible to manage the floors;
- – output: a list of solutions, where a solution is defined by a set of surfaces corresponding to housing.
- – block “surface”: allows to define an entry surface with the type of surface (free cell, possible common possible, imposed common, entries/exits);
- – block “parameters” : to define the calculation parameters.
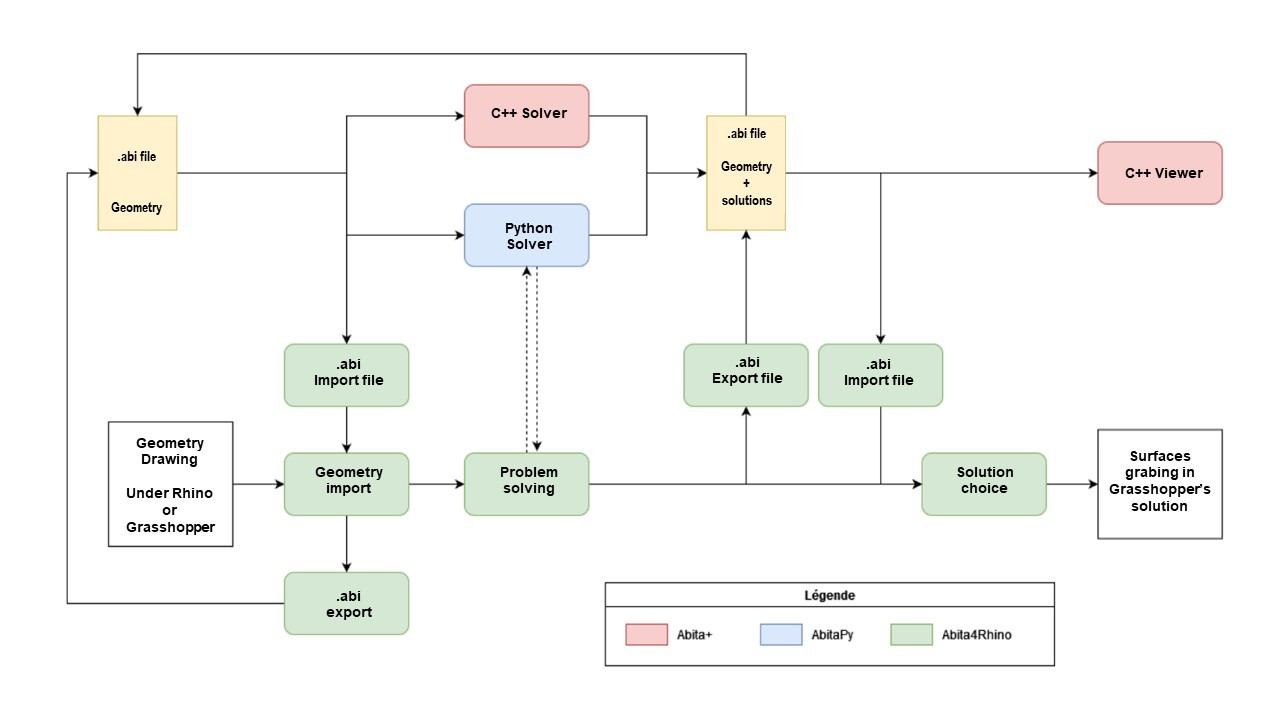
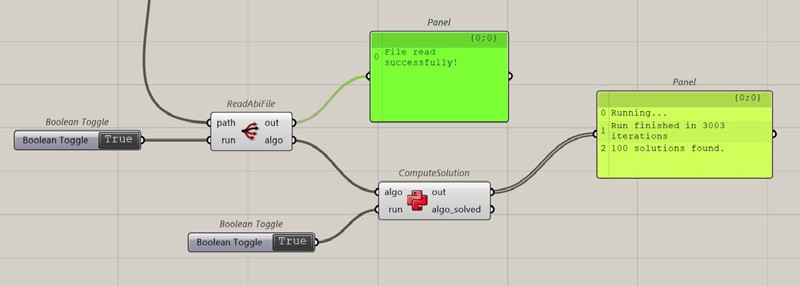
Originally, the Abita+ solution (considering only the Solver.exe and Visualizer.exe programs) was based on the following principle:
- creation of a file in .abi format to describe the geometry of the problem (i.e. the definitions of the points, elements, and floors as well as the parameters for solving the problem) ;
- use the program Solver.exe to process the previous file and generate a new .abi file, also containing the geometry but also the different solutions of the problem, with their values;
- use the program Visualizer.exe to visualize this last file and display graphically the different solutions proposed by the solver.
The new version, Abita4Rhino, is used as a set of Grasshopper components in the Rhino software. The simplest scenario for the user is as follows:
- create a set of surface elements in Rhino, then import them into Grasshopper ;
- build the geometry of the problem (points, elements, floors) using the functional blocks provided by Abita4Rhino by Abita4Rhino ;
- solve the problem using the “solver” block, using the code of the AbitaPy project;
- retrieve the list of calculated solutions and choose one of them as output of the block;
- export the solution in Grasshopper, then display it in Rhino.
Application
The solver was recorded in Python 3.7 from a C++ code made 20 years ago. Only a few standard Python libraries were used: typing, ply, random, math, and statistics. However, since Grasshopper only runs in version 2.7 (IronPython) we have translated the solver from Python 3.7 to Python 2.7.
An overlay was done with Grasshopper, a programming environment linked to the Rhino Rhino architecture software.
There is a set of nine “User Objects”, which are Grasshoppers boxes that behave a bit like a package, named AbitaPy2.
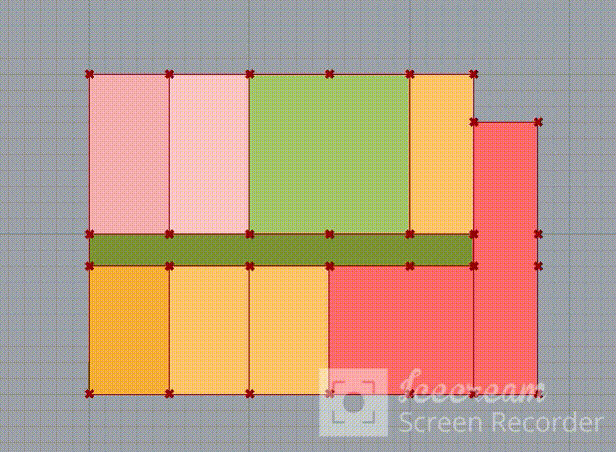
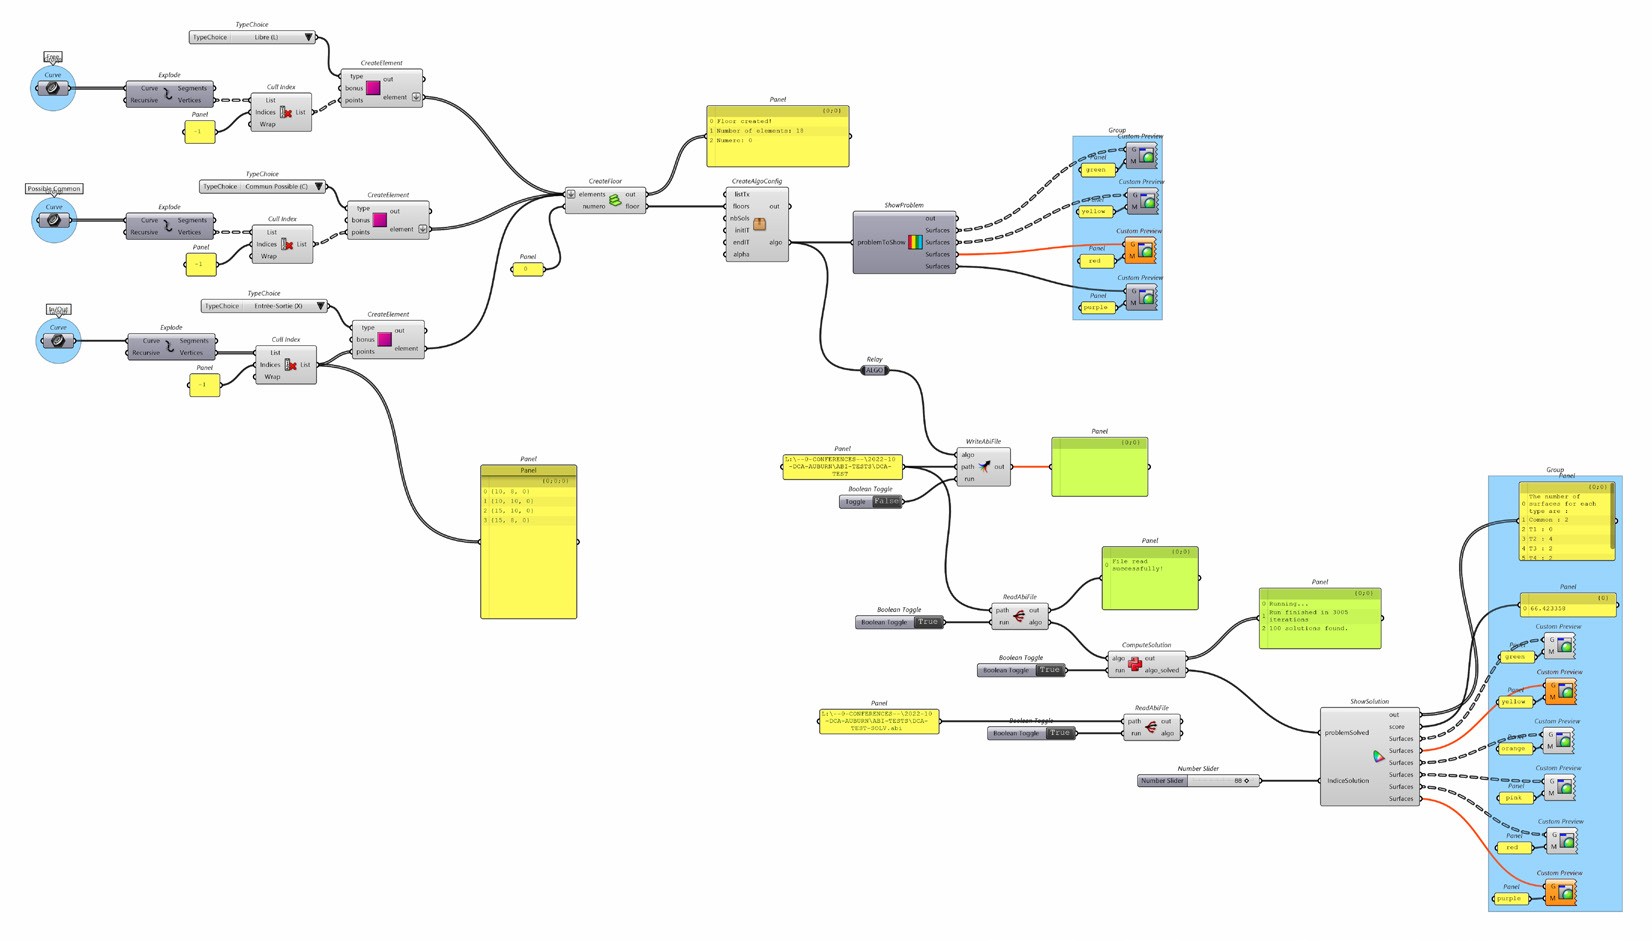
We will now review the workflow step by step. First thing first, we need to draw a basic shape that will represent what is possible to build on site. Then, we define bearing walls, entrances and required circulations in the project. This gives “cells” in which the project will sit. The next figure shows a very basic layout that we will use for the explanations. The layout is drawn in Rhino or could be described in Grasshopper. Each cell shall be described by it’s vertices and we will feed the Solver with a list of points describing Polygons.
The Solver will need the Points Pxx, for instance P0 0.00 10.00 where 0 and 10 are X,Y coordinates and then a list of descriptors.
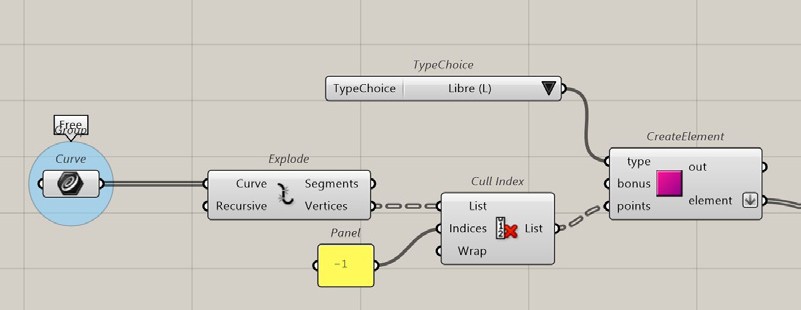
Anyway. In grasshopper, we can prepare the polygons as a list of points, check that the first point is not repeated as the last one, of so, it has to be removed, and we can feed the first component. A first set is created with what is called “Free Surface” than a second set of “Possible Common” which are spaces that can be either for apartments or for circulation, then “Forced Circulations” and finally “Entrances”.
Then final description can look like this one :

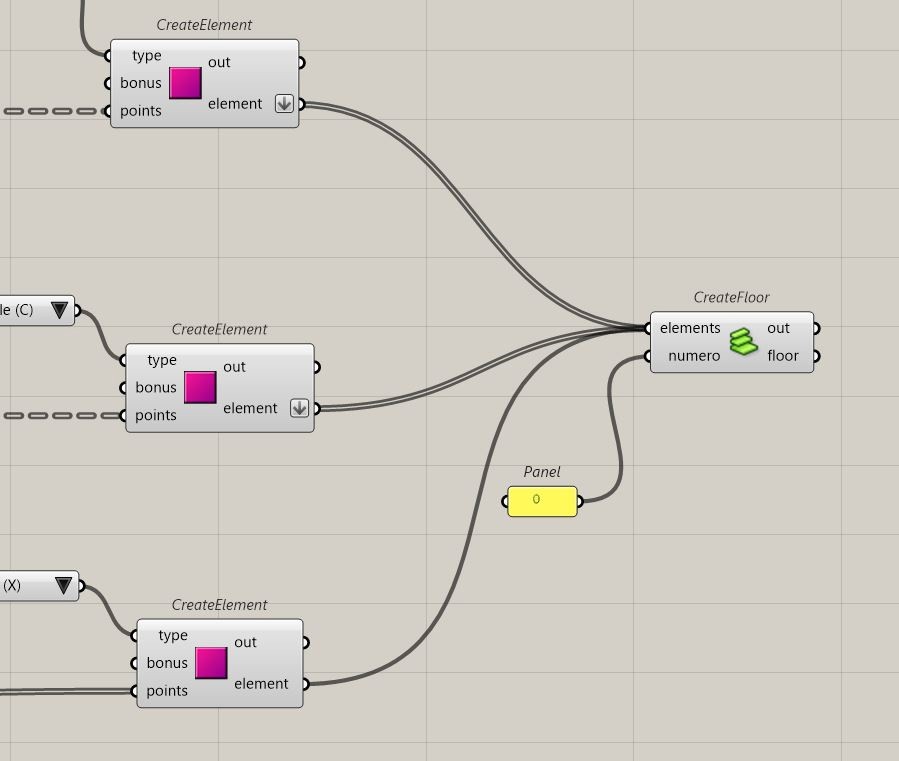
Then all Elements will feed the Floor Component. As we can have several floors, we can manage with the floors, the same way.
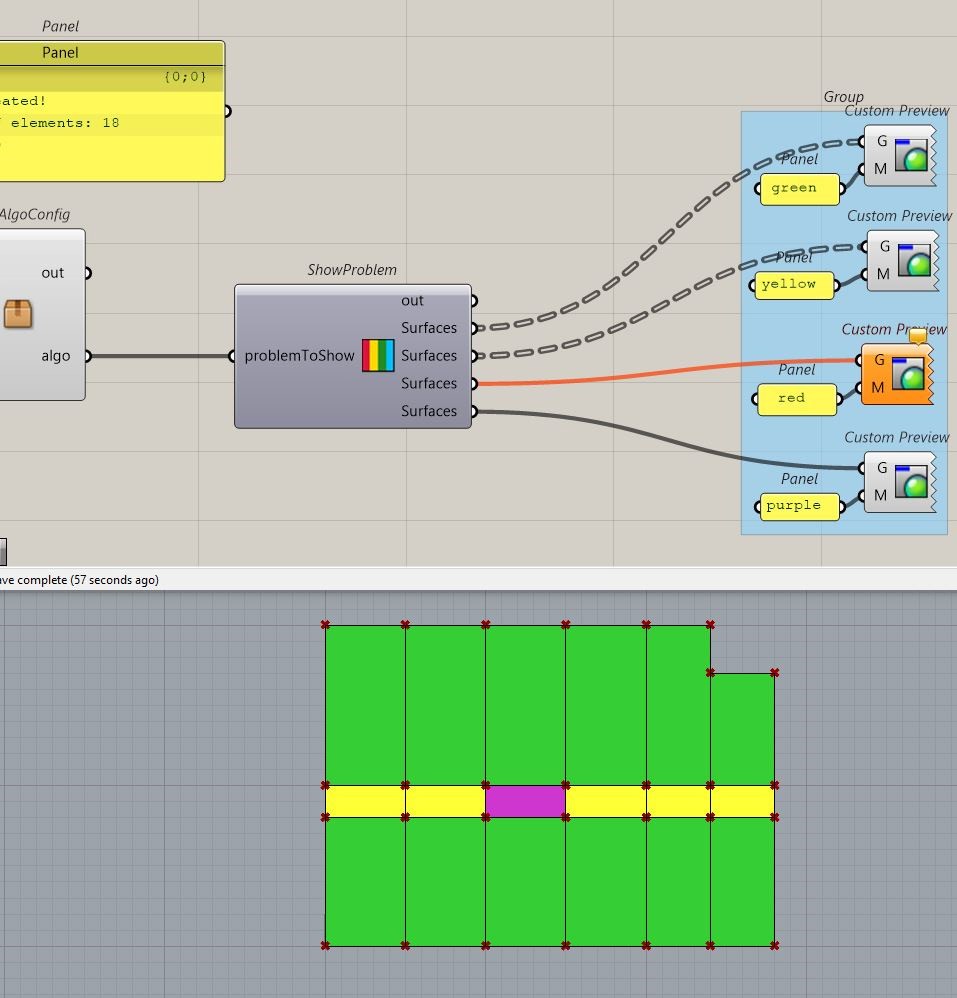
We get a message saying that the floor is created at level 0 with in this case 18 elements. We then have the possibility to visualize every separate parts of our layout, the “Show Problem” Component.

 The color code helps to visualize the different areas.
In this example we set Green as Free Spaces, meaning available for the apartments, Yellow as spaces that can be attributed either to apartments either to circulations and Purple, Entrances.
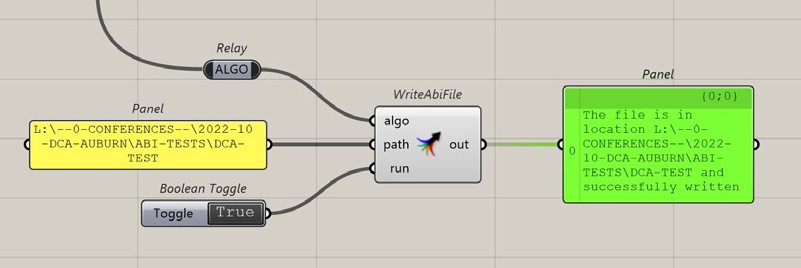
We then write the .abi file which describes the geometry and attributes.
In order to illustrate the structure of the .abi file we’ve created a very light example with 2 zones :
| A1 | -1 | ||||
| A2 | -1 | ||||
| A3 | 100 | ||||
| A4 | 0.00 | ||||
| T1 | 70.00 | 30.00 | 45.00 | 0 | 1000 |
| T2 | 80.00 | 45.00 | 60.00 | 0 | 1000 |
| T3 | 100.00 | 60.00 | 75.00 | 0 | 1000 |
| T4 | 50.00 | 75.00 | 85.00 | 0 | 1000 |
| T5 | 40.00 | 85.00 | 100.00 | 0 | 1000 |
| F0 | |||||
| P0 | 0.00 | 0.00 | |||
| P1 | 4.00 | 0.00 | |||
| P2 | 4.00 | 5.00 | |||
| P3 | 0.00 | 5.00 | |||
| P4 | 7.00 | 0.00 | |||
| P5 | 7.00 | 5.00 | |||
| E0 | 4 | 0 | 1 | 2 | 3 |
| E1 | 4 | 1 | 4 | 5 | 2 |
| X1 | |||||
The Axx sections fixes the number of iterations and the number of solutions we’re aiming. This can be changed with a specific component. The Txx section describes the apartment’s typology. As we said before, T1 is one room and in this example it goes from 30 to 45m². The Fxx section describes the number of floors. Here we have only one. The Pxx section lists all points with coordinates X and Y. The Exx section lists the polygones, the first number gives the number of vertices and the other numbers give the list of points from the previous list. 0 refers to point P0. The Xxx section says that the polygon 1 is Entrance.
Ones done, the .abi files is sent to the Solver.
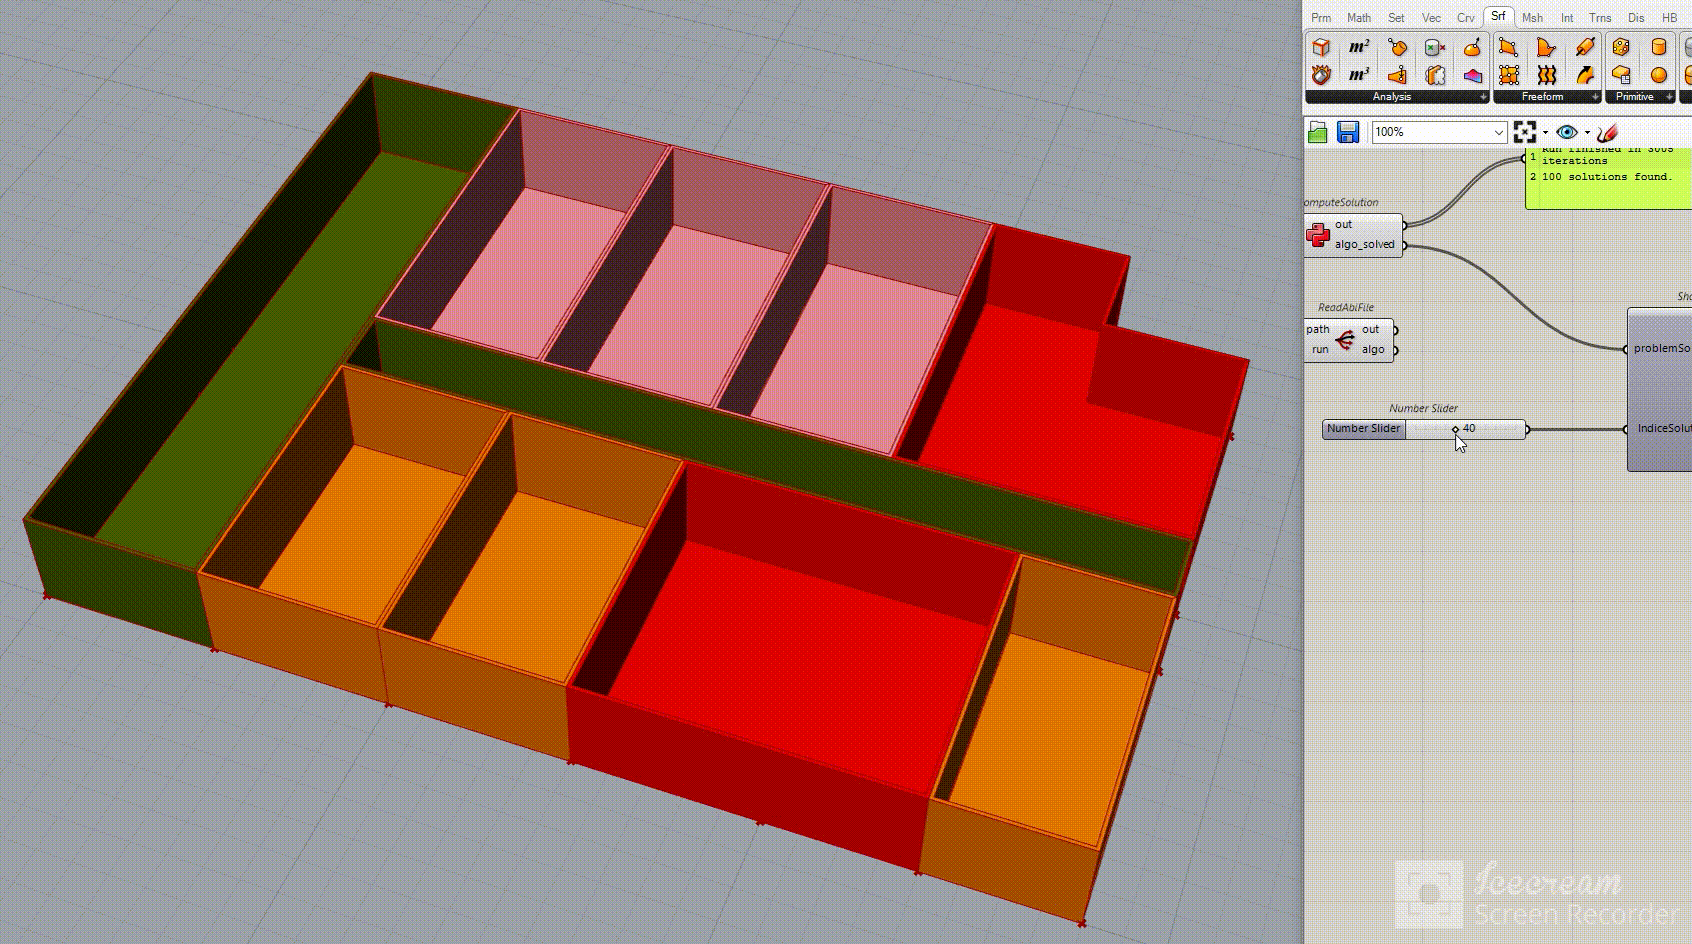
Ones solutions are calculated, we can visualize them
with the solution explorer which is called “Show Solutions”. With the cursor we scroll through the given solutions.
Using Grasshopper allows to design the way we
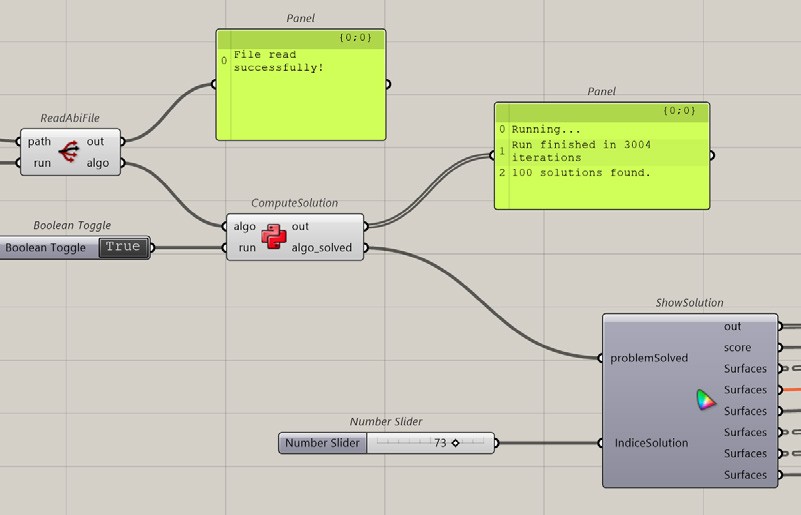
want to represent the results. Here we chose 3D by outlining the surfaces boundaries and extruding them.
As it’s editable geometry many information can be extracted as surface, dimensions, linear of openings and so on.
Discussion
Abita+ is a generative tools for sketching. It does not give the one and only solution but helps to find one good solution among at least a hundred. As it is Grasshopper integrated, it offers a wide range of possibilities.
First, the starting geometry can be derived from a previous evaluation made with solar or visual constraints that can be realized in Grasshopper. The resulting geometry will be then imported into Abita+ to evaluate the number of apartments we can obtain.
We can also do it the other way round, evaluating the solar gains (for example) from a given solution by Abita+, but it gives more meaning in terms of stainability workflow to star with the environmental constraints to elaborate the layout.

One other output would be to use the Galapagos component in Grasshopper to browse into the results with more complex criteria. The first version of Abita+ had a tool to evaluate the results in terms of performances. In this new version, this is dedicated to Grasshopper’s components, existing ones and those to come.
This version still bears some errors and strange results sometimes come out. In the “rules” given to the algorithm, each apartment shall have a connection to the circulations and to the outside wall. In this version, it sometimes not follow the rules. A new version will be developed soon to track those bugs.
The future of design.
Abita+ is not the only tools to automatically design apartments or to optimize space allocation. Our version was first release in 2001, but further solutions prompt during those 20 years. Architect Mazlin Ghazali produced impressive examples of parametric design for architecture with self organizing spaces in 2007 (https://www.youtube.com/watch?v=EhjUli4cYEg&ab_ channel=MazlinGhazali)
Voxopolis is another pionner example among many that brings an elegant solution for self organizing spaces. Voxopolis (http:// cerojugadores.com/archives/978) is a research project integrated in the MAS CAAD (Master of Advanced Studies, Computer Aided Architectural Design) in Zurich that studies the construction of the city from logarithmic operations based on the theory of zero actors. This project was described in 2013.
Computational Design spread in many major software. Following Grasshopper principle, we have Dynamo in Revit which is fully integrated to the Autodesk’s flagship. Archicad proposes it’s own module called Paramo which is not as developed as Grasshopper, but surely will be. Interestingly Blender has launched Geometry Nodes which is also a node based design tool. Many examples refers to parametric architecture.
We won’t list all solutions we’ve seen, but two of the most advanced could be the one produced by Finch Architects in Austria (finch3d.com) and SpaceMakerAI (www.spacemakerai.com ). SpacemakerAI offers a wide range of tools including spatial allocation of apartments based on investor’s briefs but also, climate studies, thermic performances and more. Is it replacing architects ? Obviously not, but it changes the design process by introducing at a very early stage stainability by helping complex evaluations like sun paths, shadow casting, thermic optimizations and so on.
Close future will incorporate Artificial Intelligence in the Design WorkFlow, that’s what we need to be ready for.
Acknowledgment
The development of Abita+ was originally made in C++ by Michel Ferry (MFRDC) under the Laurent Lescop’s specifications. The original interface has been developed by MGDesign. The Grasshopper version has been developed under the supervising of Myriam Serviere, Vincent Tourre. The development team is Alexandre Boulanger, Alexis Delage, Anne- Sophie Jourlin, Lénaëlle Le Roy et Louis Pautrat.