Task
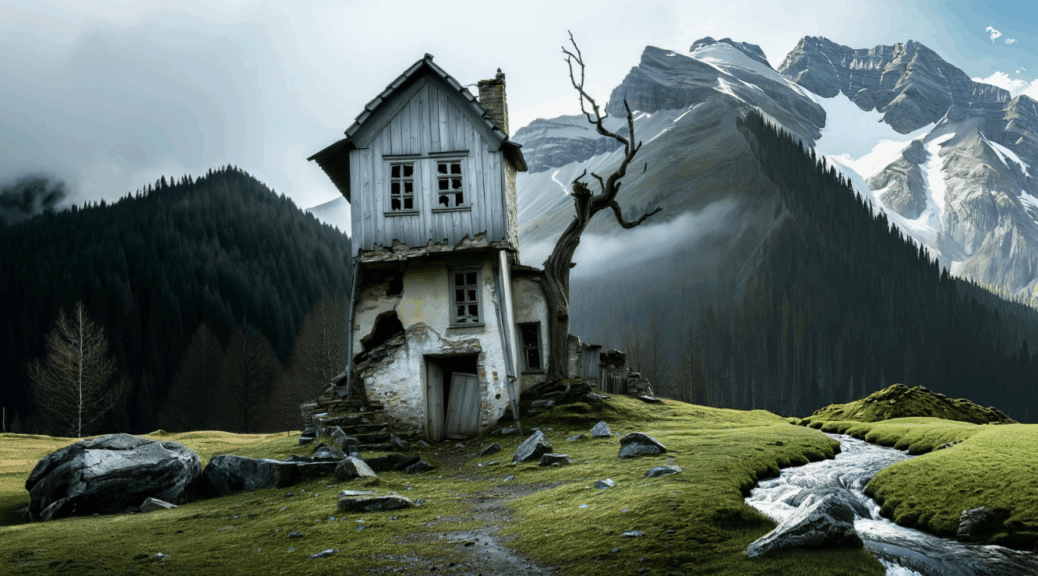
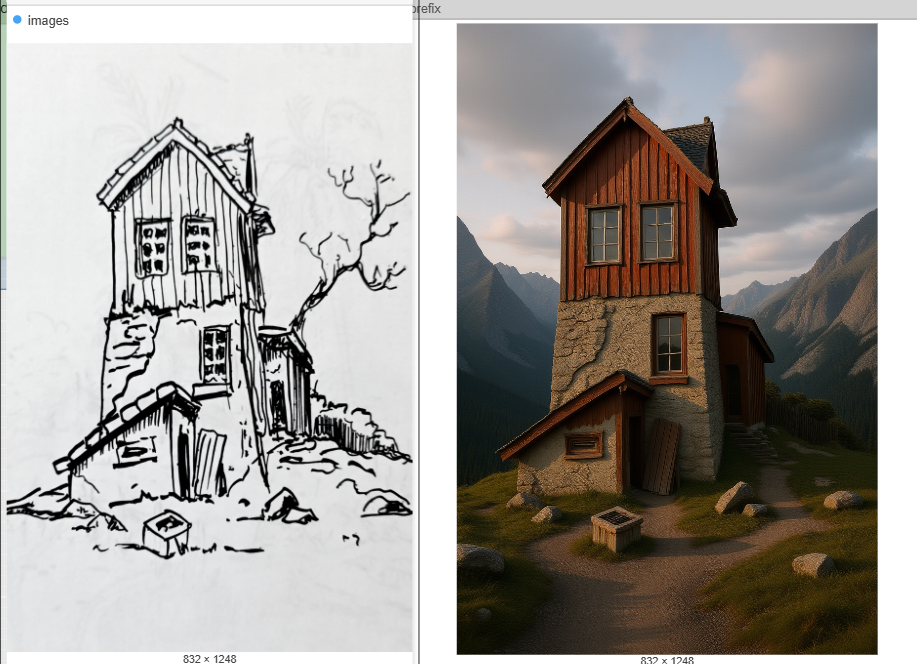
This tutorial shows how to get a photorealistic render from a sketch. The tutorial explains how to use it to transform a sketch or a simple drawing into a detailed render. This workflow leverages the Flux.1 Kontext Dev model, which is optimized for in-context image editing, then Flux with Controlnet and also SD3.5 with Controlnet.
Flux Kontext
Flux Kontext is an image editing model used to apply specific styles to images and transform them based on prompts. It is known for its ability to understand context and maintain consistency across edits.
To use it, you combine an input image with a detailed text prompt. The model works with specific diffusion, VAE, and text encoder models in a ComfyUI workflow. You can employ specific prompt techniques, such as being precise with your descriptions and explicitly stating which elements to preserve, to achieve the desired result.
Step 1: Load the Models
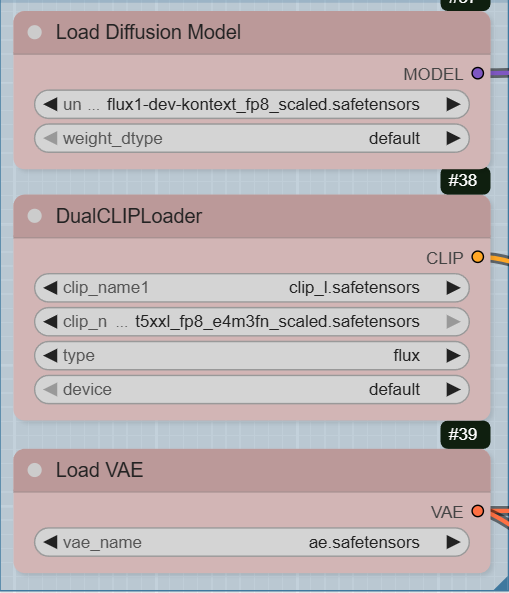
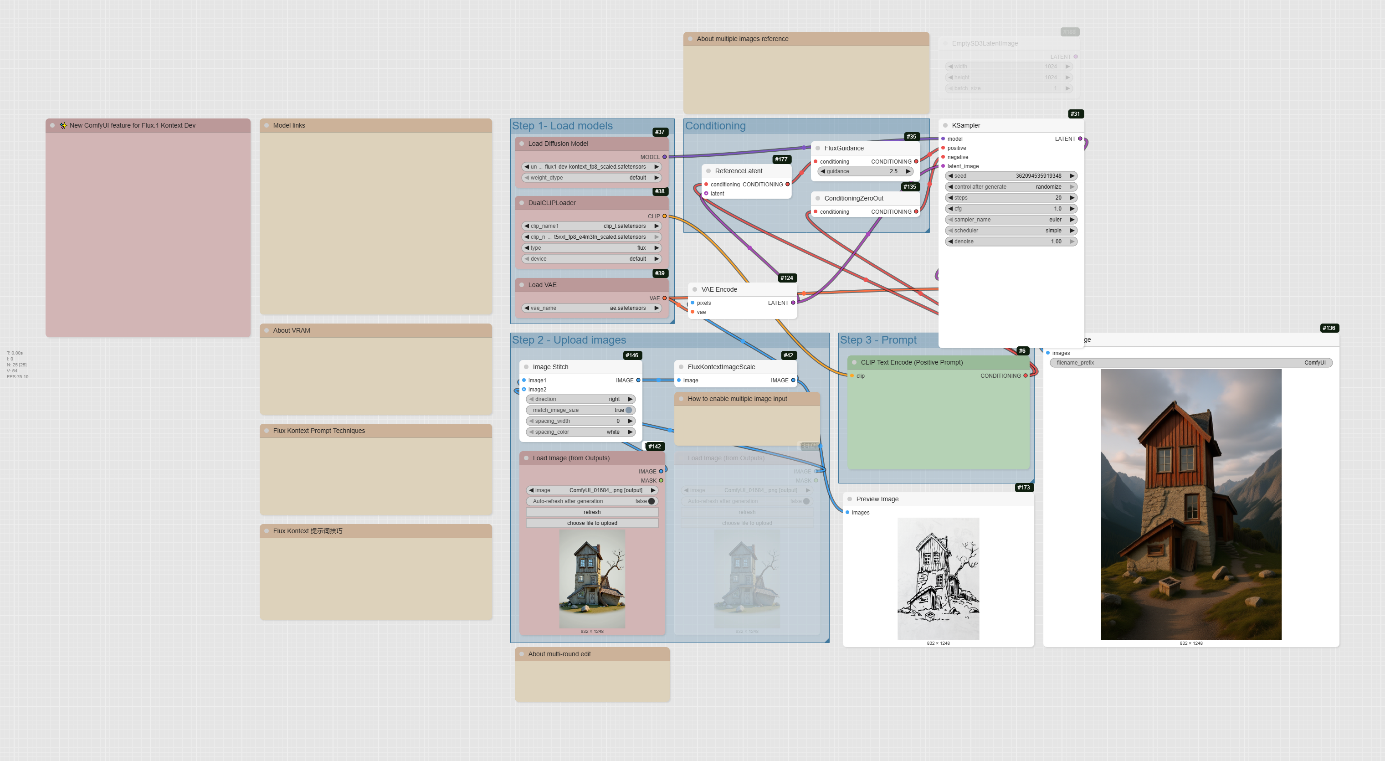
The first step is to load the necessary models, which are the foundation of this workflow.
- UNETLoader: This node loads the diffusion model, flux1-dev-kontext_fp8_scaled.safetensors, from the diffusion_models directory. This model requires about 20GB of VRAM.
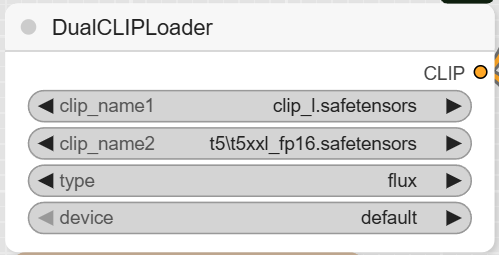
- DualCLIPLoader: This node loads the text encoders, clip_l.safetensors and t5xxl_fp8_e4m3fn_scaled.safetensors from the text_encoders directory.
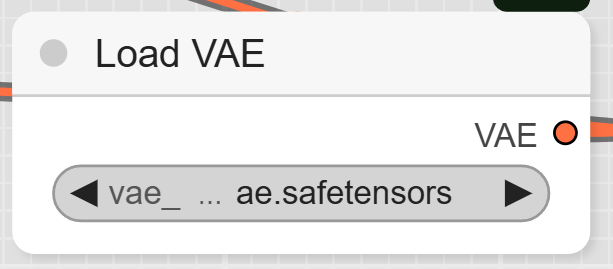
- VAELoader: This node loads the VAE model, ae.safetensors, from the vae directory.
Step 2: Upload Your Sketch
This workflow is designed for image-to-image conversion, so you will need to upload your sketch.
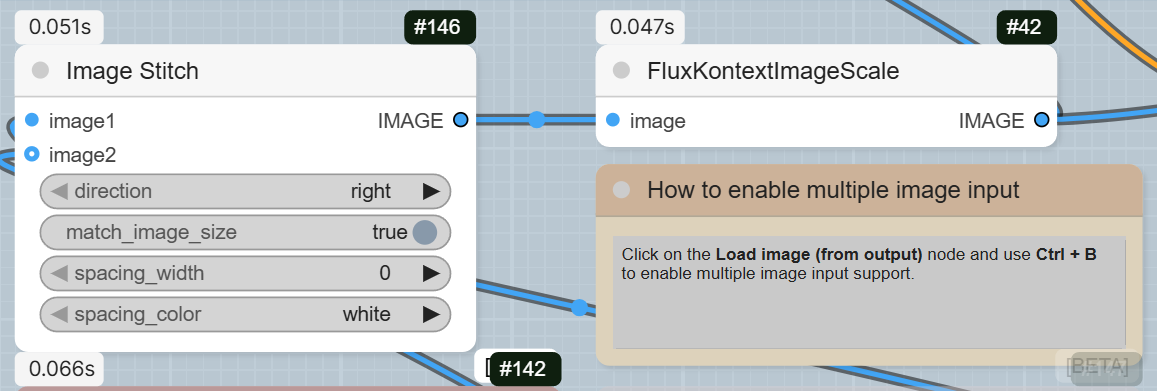
- LoadImageOutput: There are two LoadImageOutput nodes. You can use one or both to upload your image(s).
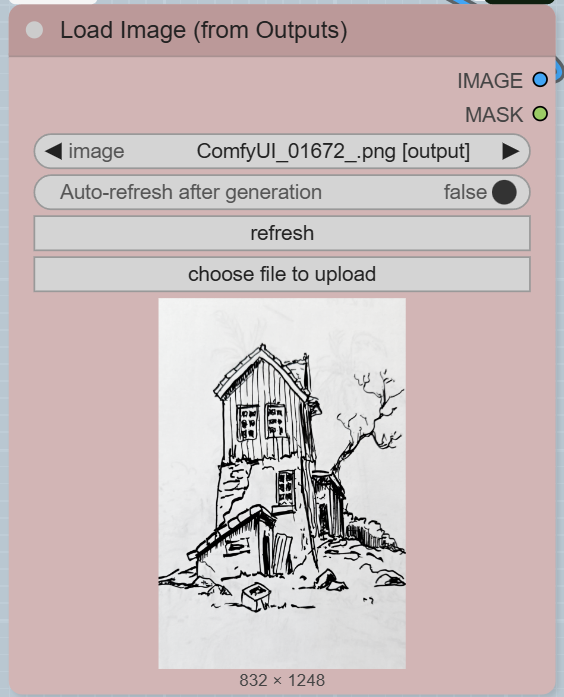
- ImageStitch: This node combines multiple images into a single image. It’s useful if you have more than one image to serve as a reference. You can enable multiple image inputs by clicking on the Load image (from output) node and using Ctrl + B.
- FluxKontextImageScale: This node scales the stitched image to the appropriate size for the model.
Step 3: Write Your Prompt
The prompt is what defines the style and content of the final render.
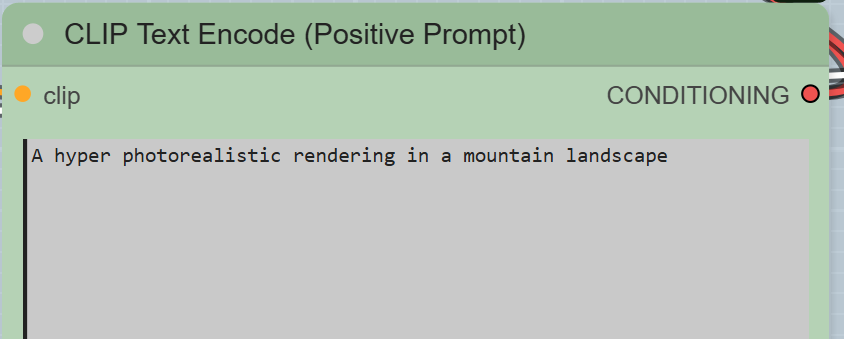
- CLIPTextEncode (Positive Prompt): In this node, you write a detailed description of the final image you want. The example prompt is « A hyper photorealistic rendering in a mountain landscape ».
Step 4: Sampling and Decoding
This is where the magic happens as the model transforms your sketch based on the prompt.
- VAEEncode: This node converts your input image into a latent space representation, which the KSampler can work with.
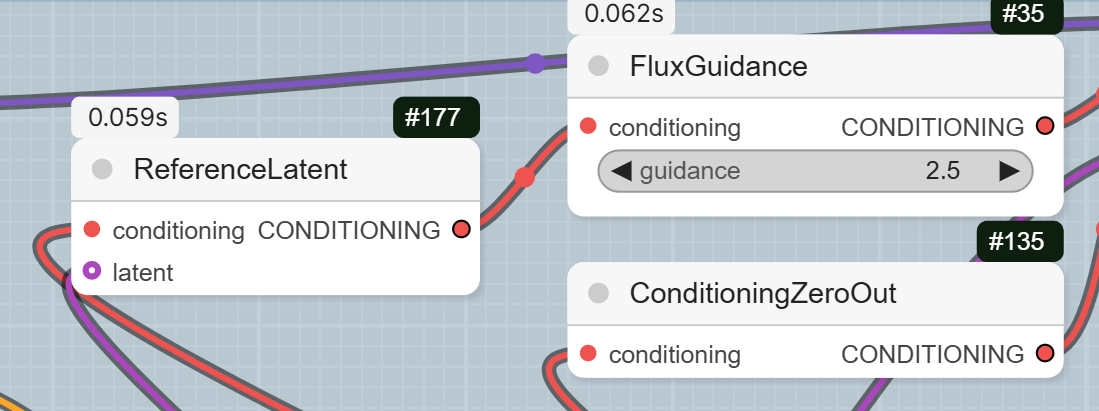
- ConditioningZeroOut: This node prepares the negative conditioning, which is used by the KSampler to remove unwanted elements.
- ReferenceLatent: This node connects the latent representation of your sketch to the positive prompt conditioning.
- FluxGuidance: This node applies the guidance to the conditioning, controlling how much the model follows your prompt.
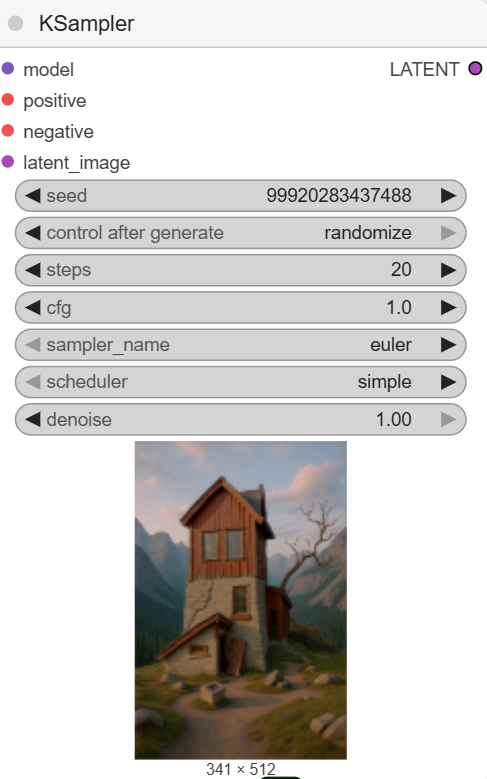
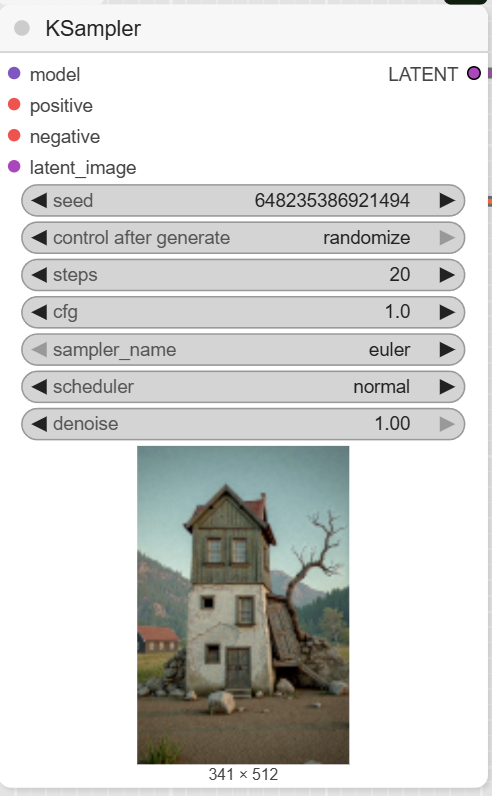
- KSampler: This is the core sampling node that generates the latent image with the new style. The workflow sets the steps to 20, cfg to 1, and uses euler as the sampler_name.
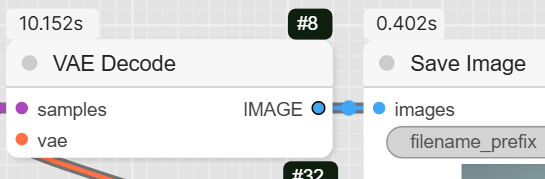
- VAEDecode: After the KSampler is done, this node decodes the new latent image back into a viewable image format.
- PreviewImage: This node shows a preview of the final image.
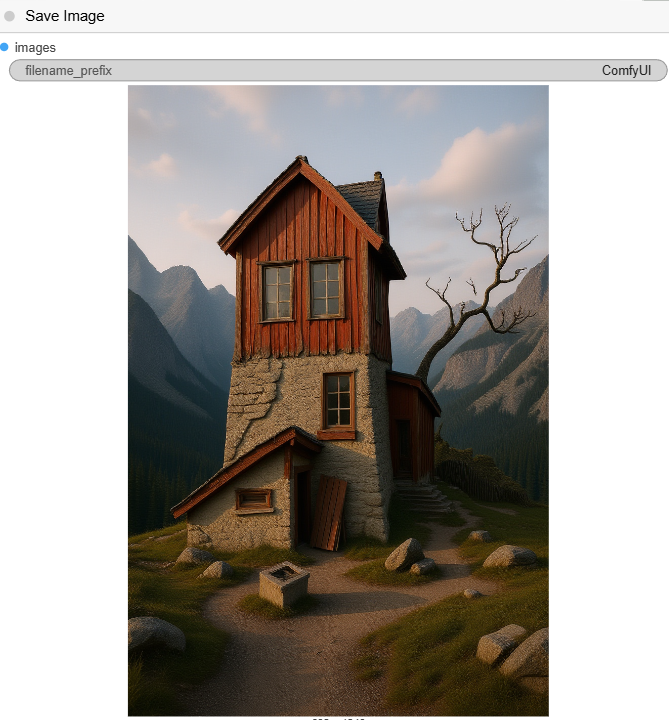
- SaveImage: The final node saves the completed image to your computer.

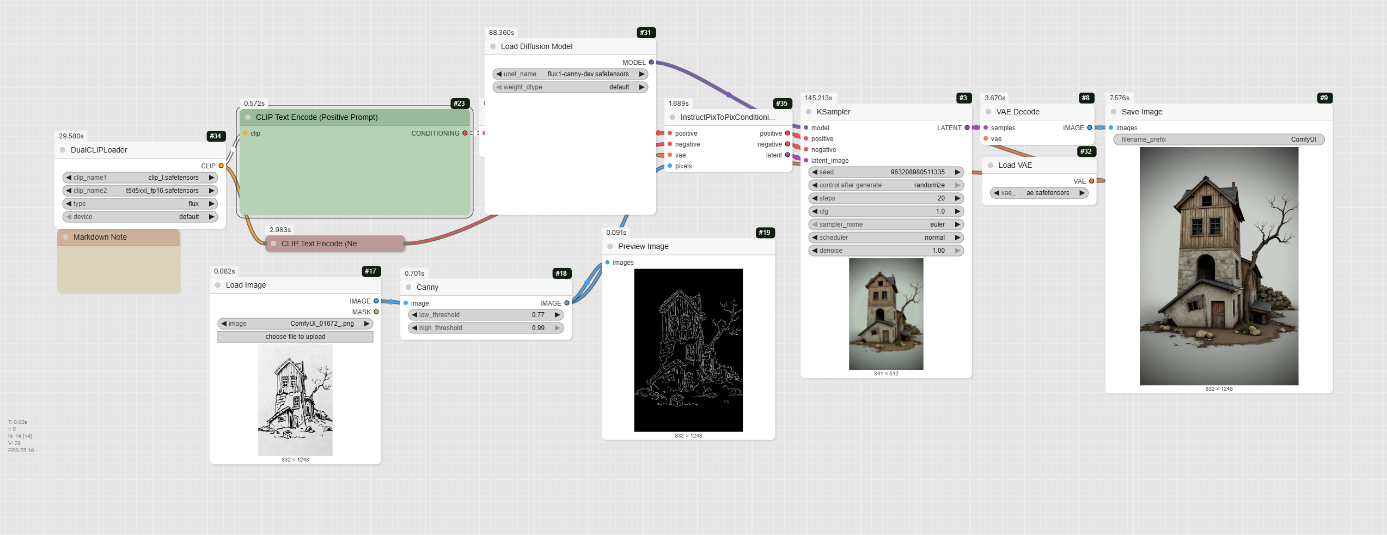
Flux Canny
A Different Approach to Sketch-to-Render
This new workflow, featuring the flux1-canny-dev.safetensors model, is different from the previous one. While both workflows can transform a sketch into a render, this one uses a specific control method called Canny edge detection.
- How it Works: The Canny node takes your input image and detects its edges, creating a simplified black-and-white line drawing. This line drawing is then used as a control image for the diffusion model, which ensures that the final rendered image adheres closely to the structure and composition of your original sketch. This approach provides a strong structural guide for the AI.
- Pros and Cons:
- Pro: This method gives you more control over the final composition. The AI is less likely to alter the pose or structure of your sketch, making it ideal for architectural plans, character designs, or any image where maintaining specific lines is critical.
- Con: The reliance on Canny edge detection can sometimes lead to a « stiff » or less creative final output if the AI follows the lines too rigidly. The previous workflow, which uses ReferenceLatent, offers more flexibility and is better for style transfer or artistic interpretations where you don’t need to strictly preserve every line from the input image.
Step 1: Load the Models
Begin by ensuring all the necessary models are loaded to power the workflow.
- UNETLoader: This node loads the flux1-canny-dev.safetensors model.
- DualCLIPLoader: This node loads both clip_l.safetensors and t5xxl_fp16.safetensors from your text_encoders directory.
- VAELoader: This node loads the ae.safetensors VAE model.
Step 2: Upload Your Image and Create the Canny Map
This is where the unique Canny process begins.
- LoadImage: Use this node to upload your sketch or line drawing.
- Canny: This node is the core of this workflow. It takes your uploaded image and converts it into a Canny edge map. You can adjust the low_threshold and high_threshold to control the level of detail captured from your sketch. The output image from this node is a black-and-white edge-detected version of your input.

Step 3: Define Your Prompts
The prompts tell the AI what to generate.
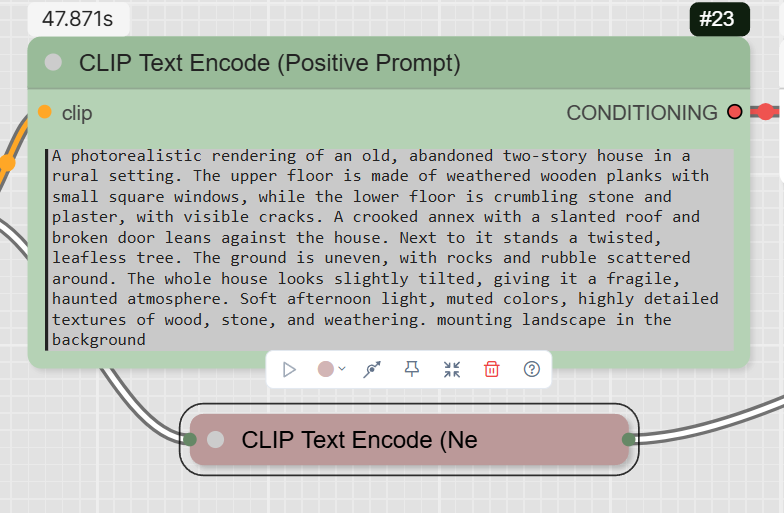
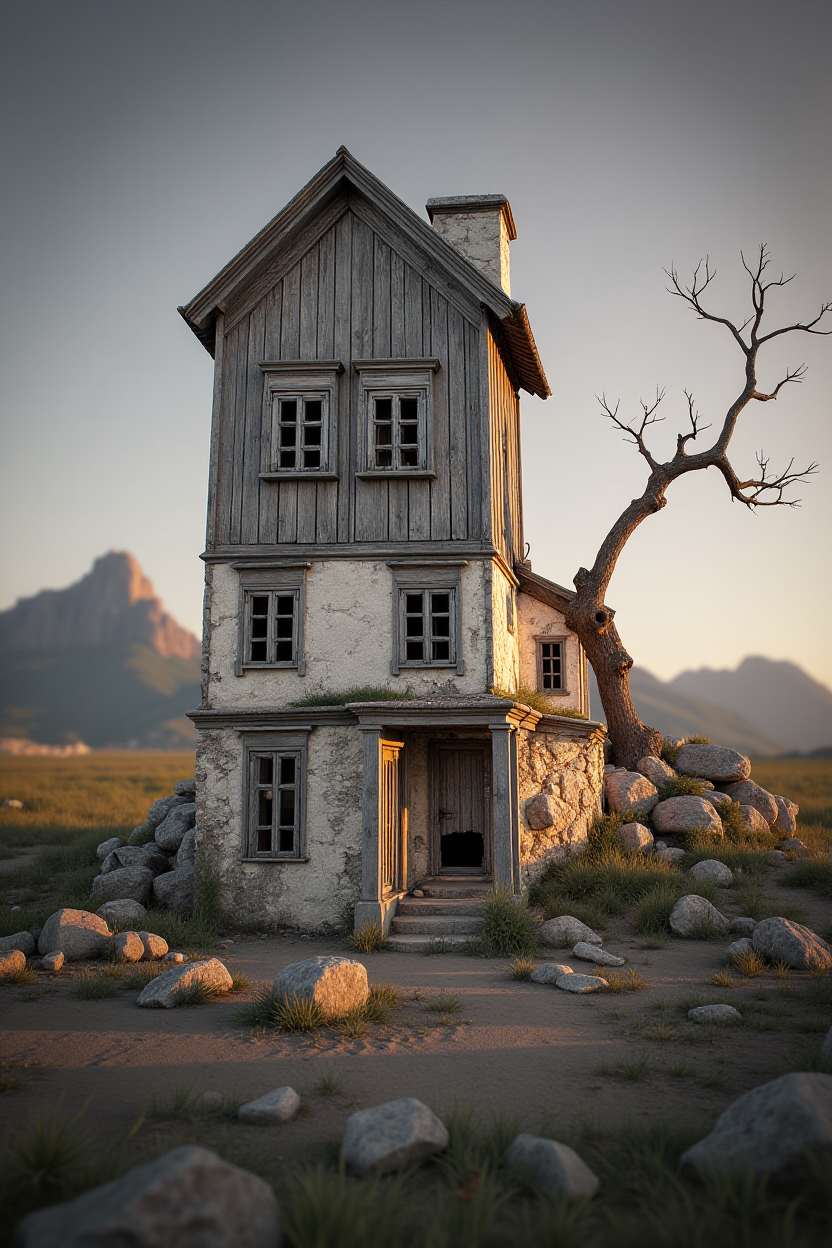
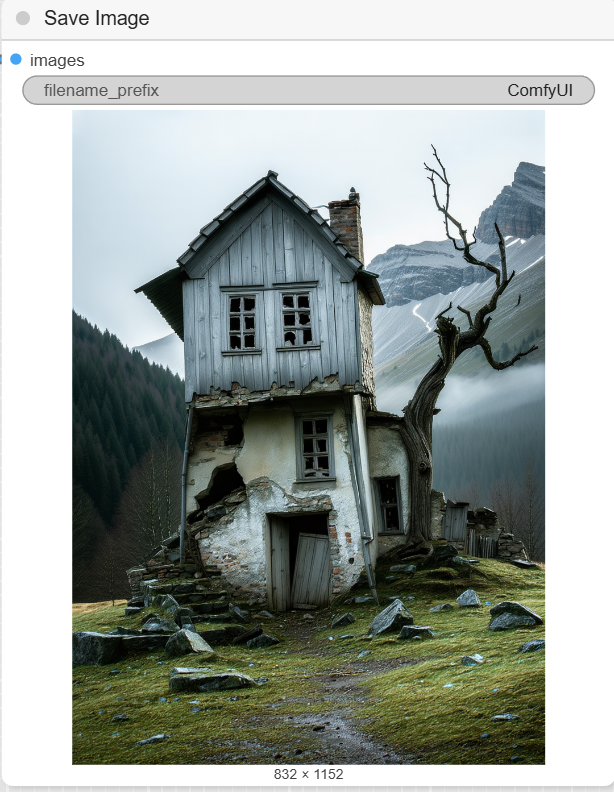
- CLIPTextEncode (Positive Prompt): This is where you write the prompt that describes your desired final image. The example prompt is a detailed description of « an old, abandoned two-story house ».
- CLIPTextEncode (Negative Prompt): This optional node is used to describe things you want to exclude from the final image. The example workflow has an empty negative prompt.
Step 4: Sampling and Decoding
Finally, the AI processes all the inputs to generate the final image.
- InstructPixToPixConditioning: This node is crucial. It combines the positive and negative prompts, the Canny edge map, and the VAE to prepare the data for the sampler.
- FluxGuidance: This node takes the conditioning from InstructPixToPixConditioning and applies guidance. The example workflow sets the guidance to 30.

- KSampler: This is the main diffusion sampler. It uses the prepared conditioning and your defined settings (steps, cfg, sampler) to generate the latent image.
- VAEDecode: This node converts the latent image from the KSampler into a viewable image.
- SaveImage: The final node saves the completed render to your computer.

The Sketch to Image with SD3.5 Large Canny
This workflow, using the sd3.5_large_controlnet_canny.safetensors model, is another way to achieve a high-quality render from a sketch. It shares the same core Canny edge detection concept as the previous Flux workflow, but utilizes a different model architecture (SD3.5 Large ControlNet).
- How it Works: Similar to the Flux Canny workflow, this method also begins by detecting the edges of your input image to create a Canny edge map. However, it then uses a ControlNet node to apply this edge map to the core Stable Diffusion 3.5 Large model. The ControlNet acts as a guide, ensuring the final image maintains the structure and composition of your original sketch.
- Pros and Cons:
- Pro: This workflow leverages a highly advanced and well-regarded model, Stable Diffusion 3.5 Large, which is known for its photorealistic capabilities and strong prompt adherence. The ControlNet approach provides precise control over the composition, making it excellent for rendering detailed and complex scenes from simple line art.
- Con: The specific models required for this workflow can be large, potentially requiring a significant amount of VRAM. You must also have the ControlNet extension installed in your ComfyUI setup.
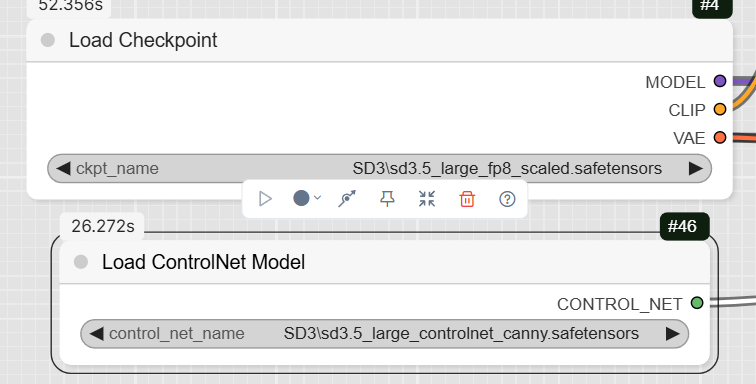
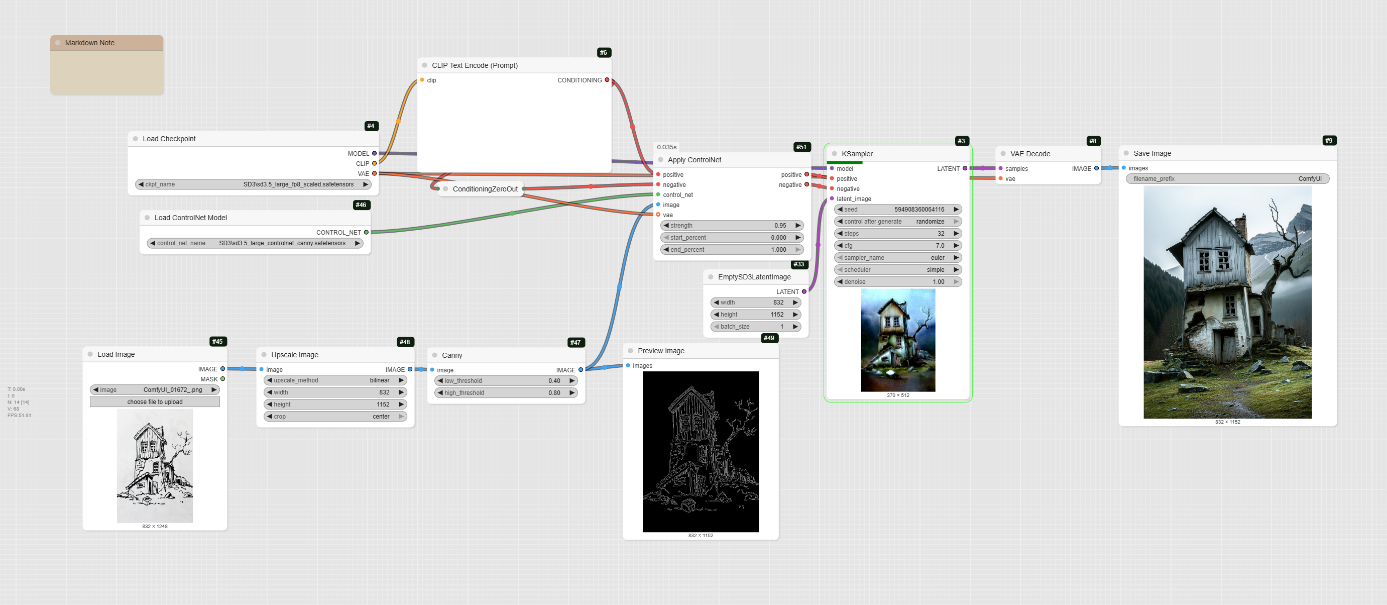
Step 1: Load the Models
You need to load three key components to run this workflow.
- CheckpointLoaderSimple: This node loads the primary diffusion model, sd3.5_large_fp8_scaled.safetensors. It also loads the corresponding CLIP and VAE models, simplifying the setup.
- ControlNetLoader: This node loads the ControlNet model specific to Canny edge detection, sd3.5_large_controlnet_canny.safetensors.
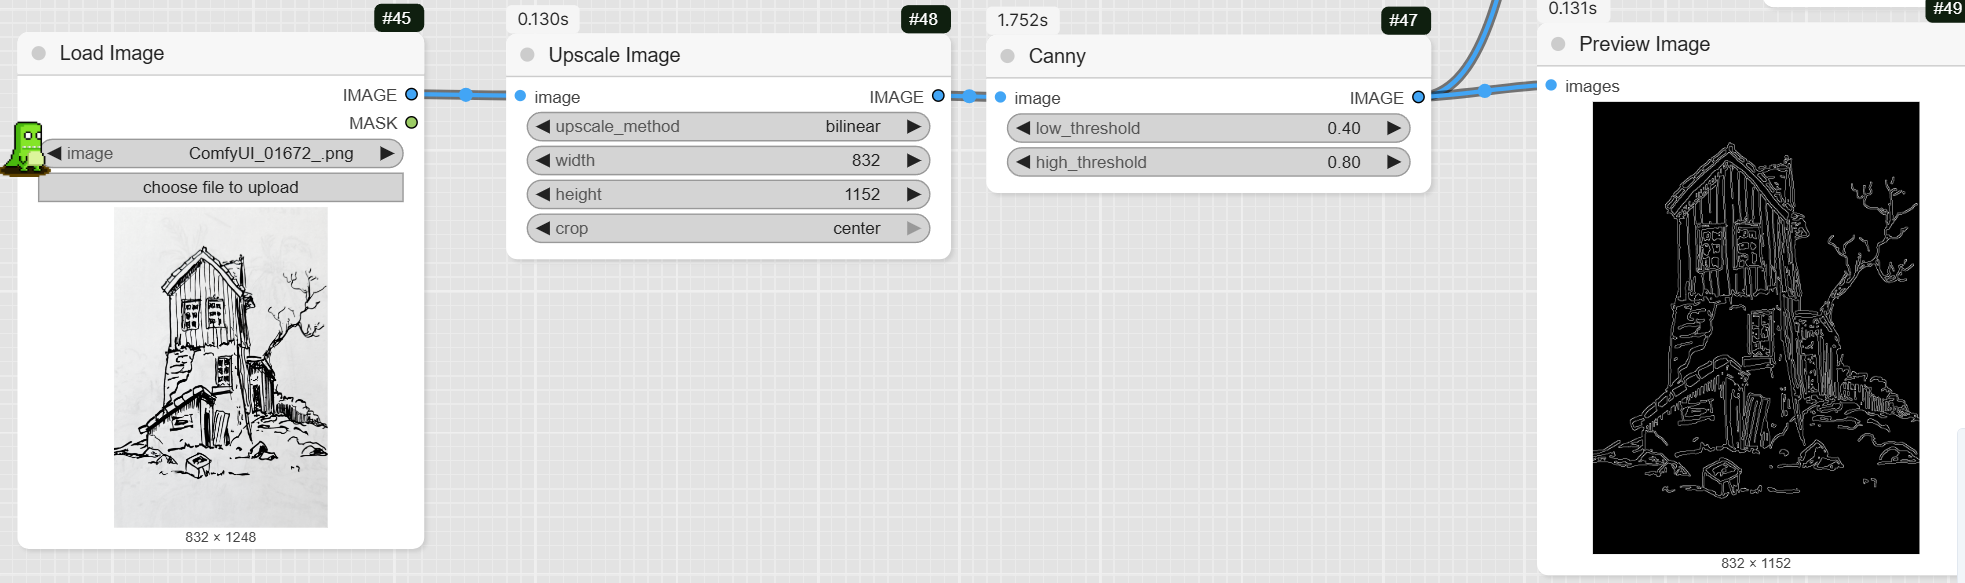
Step 2: Upload and Prepare Your Sketch
This step prepares your sketch for the AI to understand its structure.
- LoadImage: Upload your sketch or line drawing using this node.
- ImageScale: This node scales your image to the required dimensions for the model.
- Canny: This node detects the edges of your image to create a Canny map, which is used to guide the generation process.
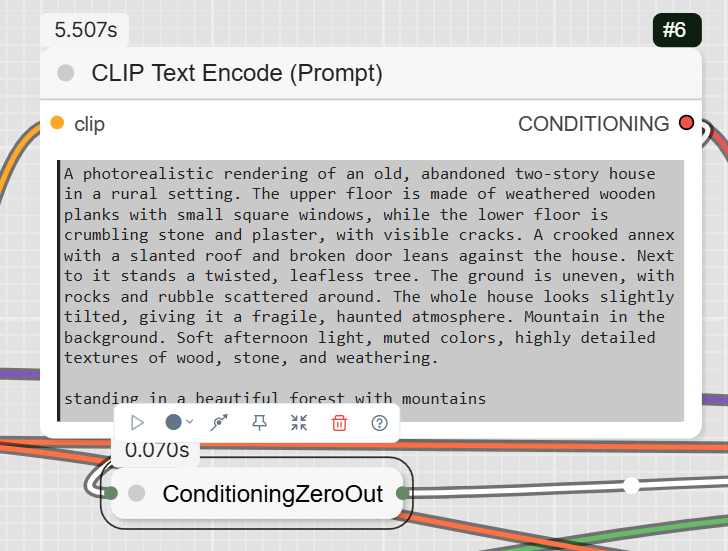
Step 3: Define Your Prompts
The prompts tell the AI what to generate and what to avoid.
- CLIPTextEncode: This is where you write your positive and negative prompts. The example positive prompt is a very detailed description of an « old, abandoned two-story house ».
ConditioningZeroOut: This node can be used to zero out the negative conditioning.
Step 4: Sample and Decode
The final steps involve processing the inputs and generating the image.
- ControlNetApplyAdvanced: This node applies the Canny edge map to your prompts, effectively guiding the KSampler.

- KSampler: This is the core sampling node that generates the image. The workflow sets the steps to 32 and the cfg to 7.
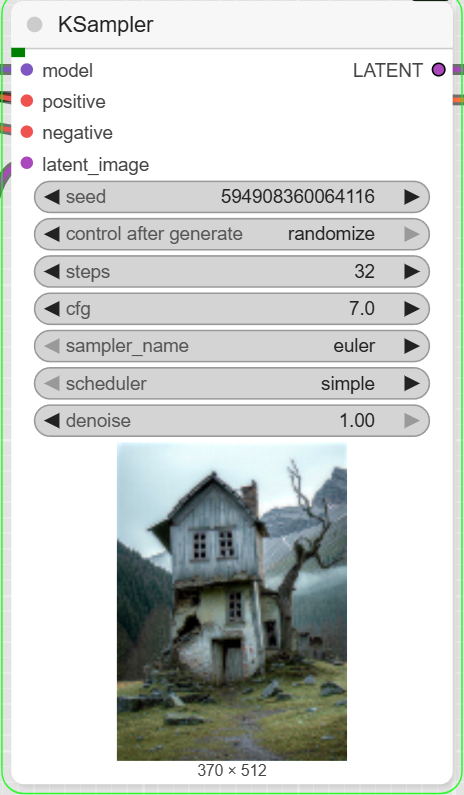
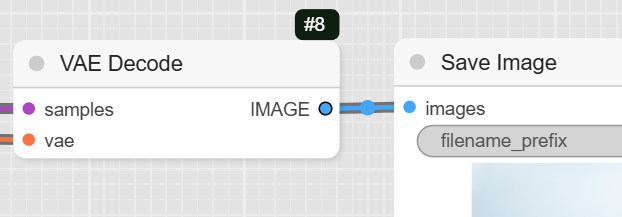
- VAEDecode: This node decodes the latent output from the KSampler into a viewable image.
- SaveImage: This final node saves the completed image to your computer.
Super laurent, merci pour le tutorial!